Product search plays a major role in how quickly customers can find and buy products in a WooCommerce store. A reliable search experience not only improves navigation but also influences how often visitors turn into paying customers.
While WooCommerce includes a basic search by default, it doesn’t allow much customization. The system only searches product titles and descriptions and lacks options for SKUs, categories, or other key product fields, which makes it restrictive as your catalog expands.
As your store grows, WooCommerce’s built-in search can struggle with detailed queries, product variations, and minor spelling mistakes, leading to missed sales and frustrated customers. These limitations become even more noticeable in stores with large inventories or niche product data, where accurate search results directly impact user satisfaction.
In this guide, we’ll look at what WooCommerce search settings can and cannot do, and how you can customize your store’s search using Advanced Woo Search to improve your store’s search experience.
What Are WooCommerce Search Settings
WooCommerce includes a basic product search feature, but it doesn’t offer a dedicated page for managing WooCommerce search settings within the dashboard.
By default, the built-in search looks only at product titles and descriptions. This simple setup works well for small stores with limited products, but it can feel restrictive once your catalog grows or your customers start searching by SKU, brand, or other attributes.
If you install the official WooCommerce Product Search extension, you gain a few additional options to control how search results appear. These include the ability to show or hide product thumbnails, prices, and add-to-cart buttons, limit the number of displayed results, or change how quickly live results appear as customers type. You can also shorten long product titles and descriptions to make the results easier to read.
However, even with this extension, WooCommerce still can’t search through SKUs, categories, attributes, or custom fields unless you add custom code. These limitations make it difficult for larger stores to deliver accurate search results or a modern, dynamic search experience.
To unlock more control (such as live AJAX search, search suggestions, relevance tuning, and the ability to include multiple data sources, etc) you’ll need a dedicated search plugin like Advanced Woo Search (AWS).
AWS integrates directly with WooCommerce and gives you a complete interface to customize how your store’s search behaves and looks, all from within your WordPress dashboard.
What You Can & Cannot Customize in WooCommerce Searches
WooCommerce’s built-in search is designed to be simple and automatic. It doesn’t come with a dedicated settings page, and you have very limited control over how it behaves. The default search looks through product titles and descriptions, but it doesn’t let you define what data is indexed or how results are ranked. These limitations highlight how restricted the built-in WooCommerce search settings really are, especially for stores with large inventories.
What You Can Customize
Since the native setup doesn’t offer any customization options, the only way to change how search works is by adding custom code. Developers can use WordPress filters and hooks to include additional product data or modify how results are displayed, but this approach requires technical knowledge. For most store owners, installing a dedicated search plugin is a more practical way to gain control over search behavior.
What You Cannot Customize
WooCommerce’s default search can’t look through product SKUs, categories, attributes, brands, or custom fields. It doesn’t support live AJAX results, search suggestions, or typo handling. You also can’t adjust relevance, ranking, or the layout of search results. Essentially, you’re limited to WooCommerce’s basic query without any visual or functional configuration options.
How These Limits Impact Product Discovery
Because the default search is so limited, customers often struggle to find the right products, especially in stores with large inventories or detailed product data. When searches return incomplete or inaccurate results, shoppers are more likely to leave without purchasing.
For this reason, many store owners use dedicated search plugins like AWS, which extend WooCommerce’s capabilities with broader data coverage, live results, and relevance controls.
How to Customize WooCommerce Search (Step-by-Step Guide)
Since you cannot customize the default WooCommerce search, you need to rely on third-party plugins like Advanced Woo Search to gain more control over what data is searchable, how results are displayed, and how quickly they appear for users. In the following steps, we’ll walk through how to install and configure AWS.
Note: Advanced Woo Search is available in both free and paid versions. The free version covers core features like live AJAX search and basic search field customization, while the Pro version adds advanced options such as search analytics, custom taxonomies, brand and SKU support, and keyword highlighting. The following steps demonstrate setup using the Pro version of the plugin.
Step 1: Install & Activate Advanced Woo Search
To begin customizing your WooCommerce search, you first need to install and activate the Advanced Woo Search plugin. The installation process is straightforward and only takes a few minutes.
The plugin automatically integrates with WooCommerce and most WordPress themes.
Step 2: Customize the WooCommerce Search
Once the plugin is installed, the next step is to configure its settings to control how searches work and appear on your store. Go to Advanced Woo Search → Settings. The plugin’s customization options are divided into four main sections: Search Config, Search Form, Search Suggestions, and Search Results. Each handles a different part of the search experience.
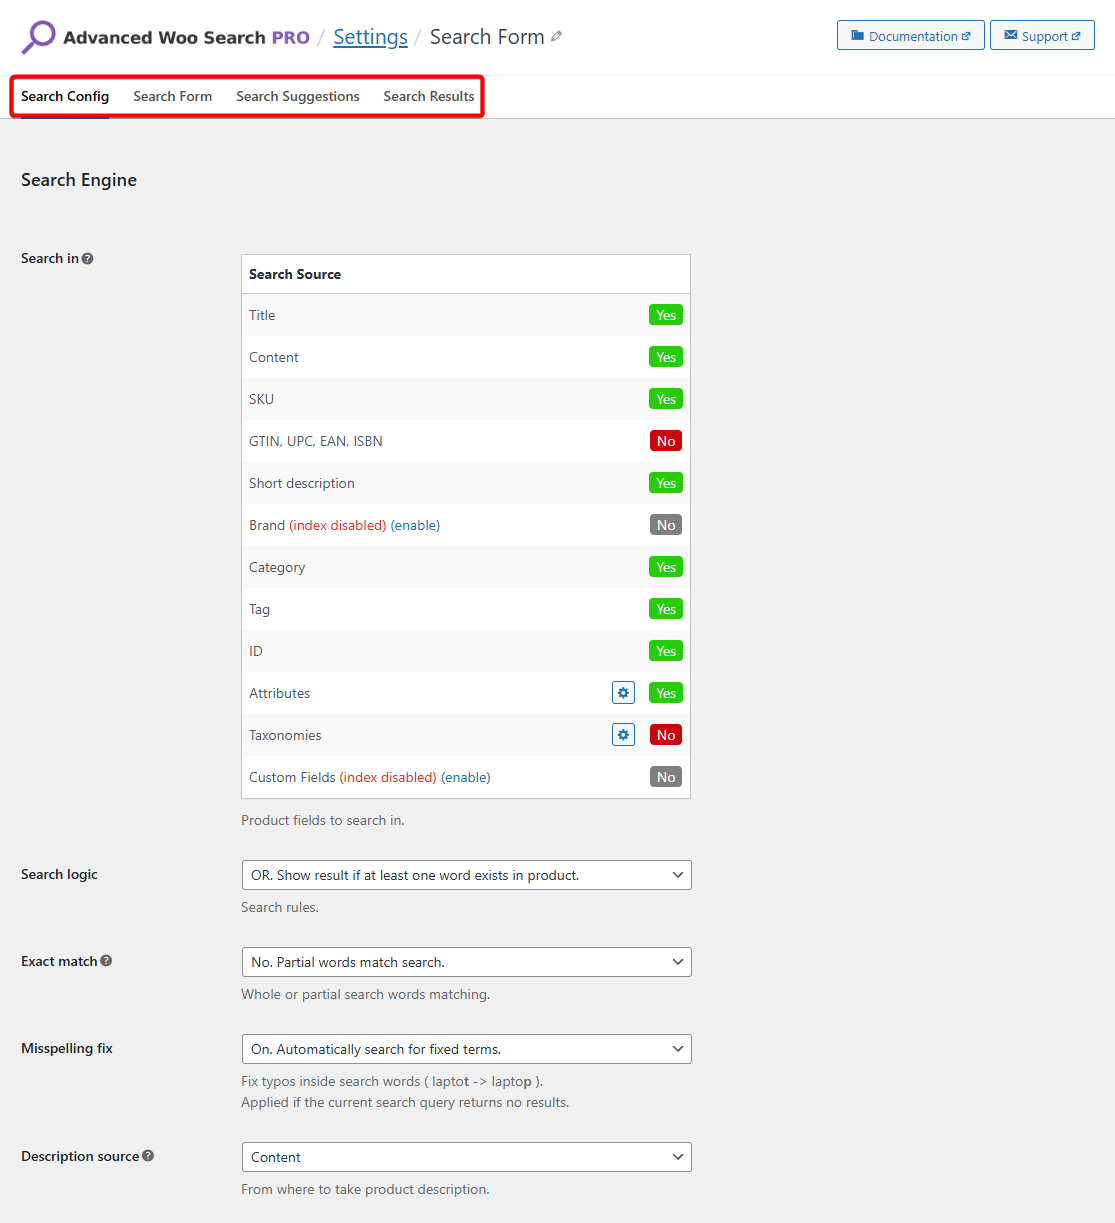
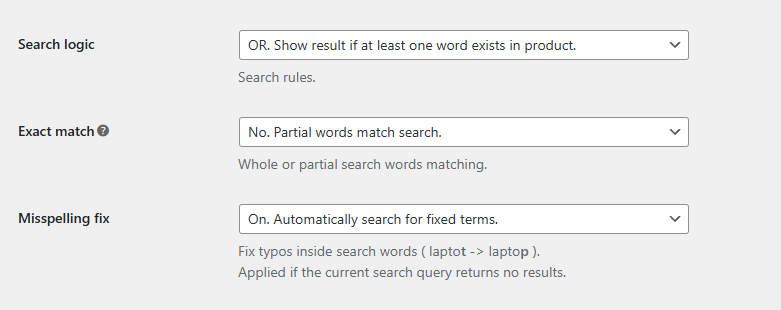
Search Config: Define what the plugin searches for. You can include product titles, descriptions, SKUs, categories, tags, attributes, or custom fields. You can also control search behavior by setting search logic (AND/OR), enabling exact match, misspelling fixes, and even connecting Google Analytics to track search activity.
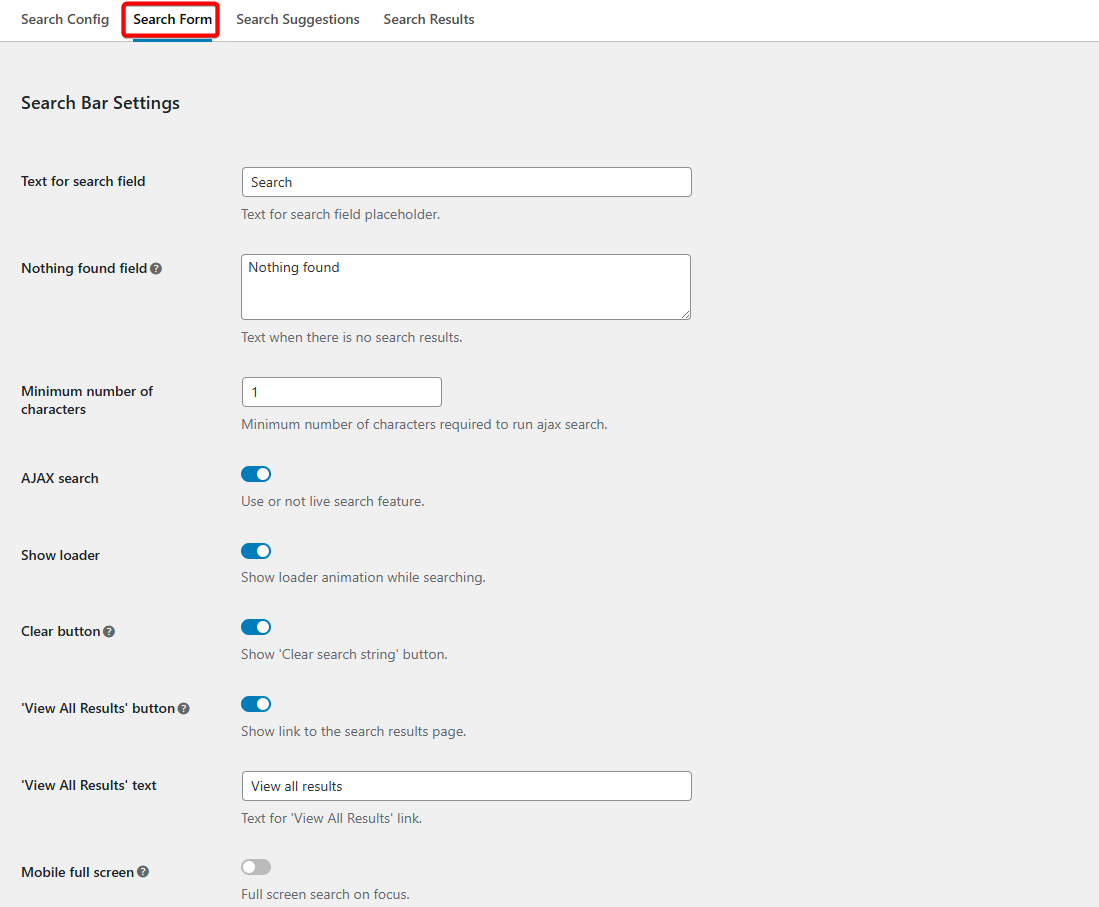
Search Form: Adjust how the search bar behaves and looks. Here, you can change the placeholder text, enable AJAX search, show a loader animation, and add buttons like Clear Search or View All Results. You can also enable full-screen search on mobile or choose a layout that fits your theme.
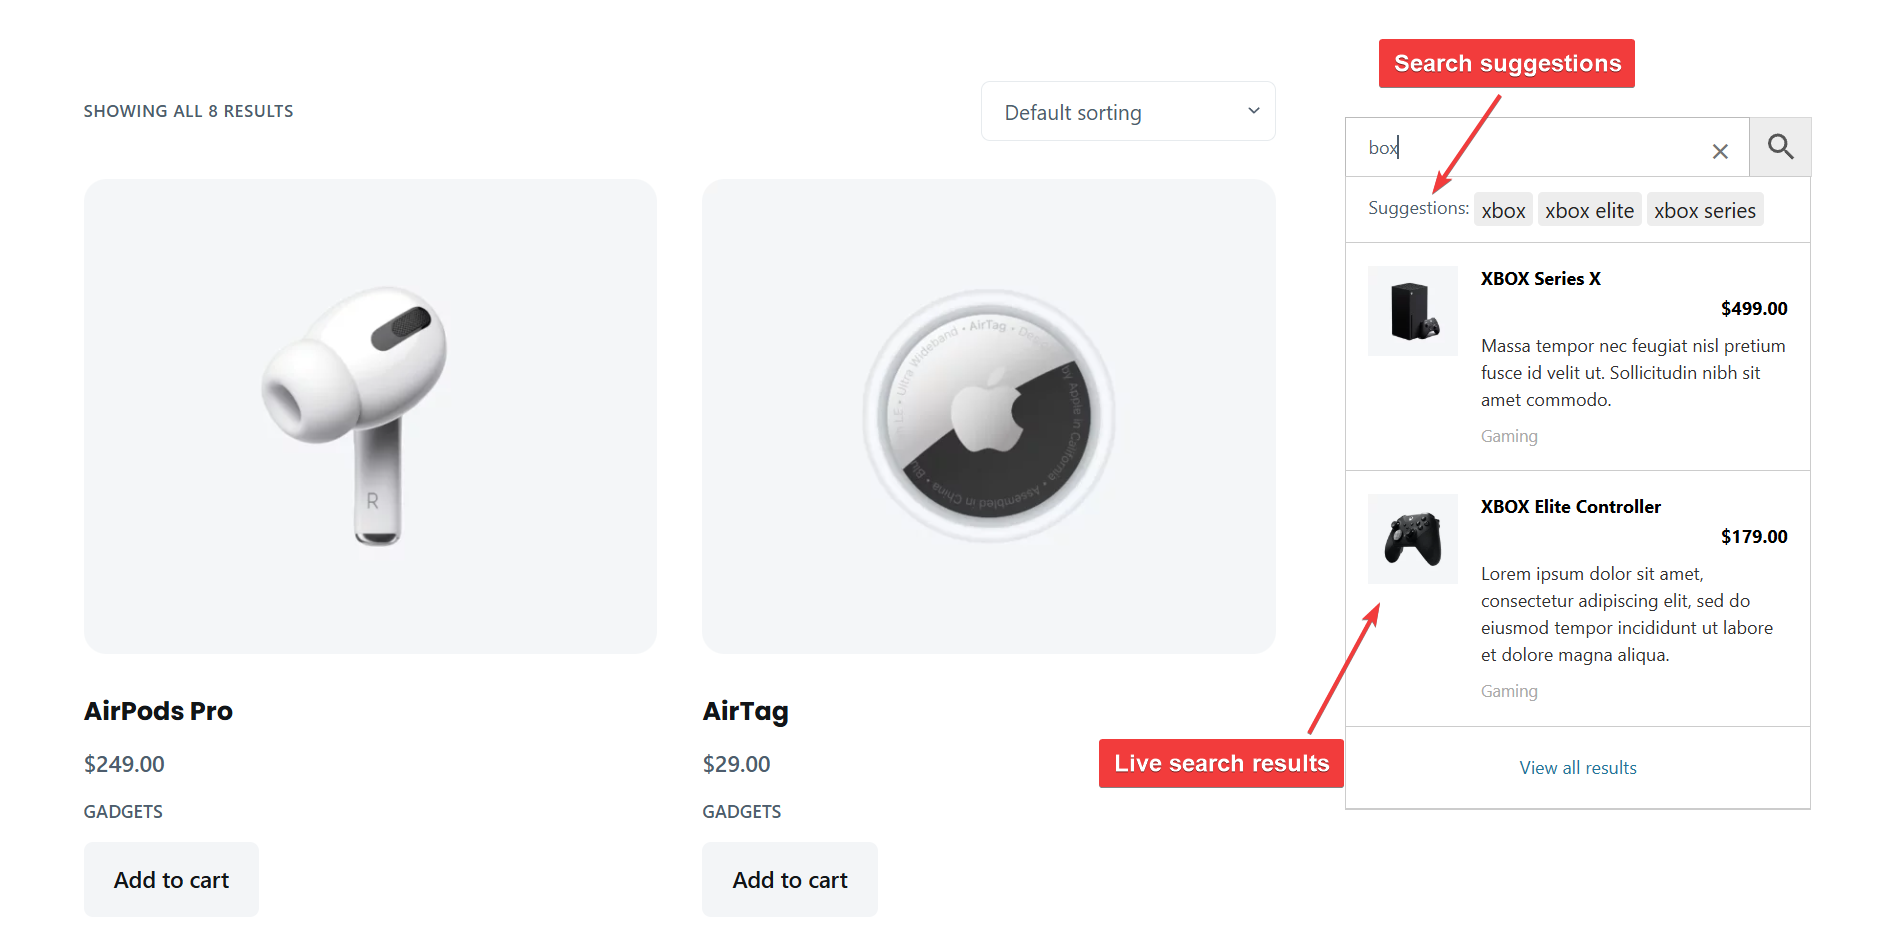
Search Suggestions: Configure automatic keyword suggestions that appear as users type. You can enable this feature, choose how many suggestions to show, and decide whether they should be based on product titles or categories. You can also control what happens when a user clicks a suggestion which either trigger an instant AJAX search or redirect them to the search results page.
Search Results: Customize what appears in your search results and how it’s displayed. You can select a layout style (inline, grid, or big grid), set how many products to show, and include details like price, SKU, rating, brand, sale badge, and stock status. You can even highlight search terms or display “Add to Cart” buttons directly within the results.
These settings together determine how powerful and intuitive your WooCommerce search feels. Once you’ve adjusted them, click Save Changes. In the next step, you’ll decide exactly what data AWS should include when running a search.
Step 3: Choose What to Include in Search Results
This section helps you refine your WooCommerce search settings by selecting which product data to include in the search index, ensuring that your results are as complete and relevant as possible.
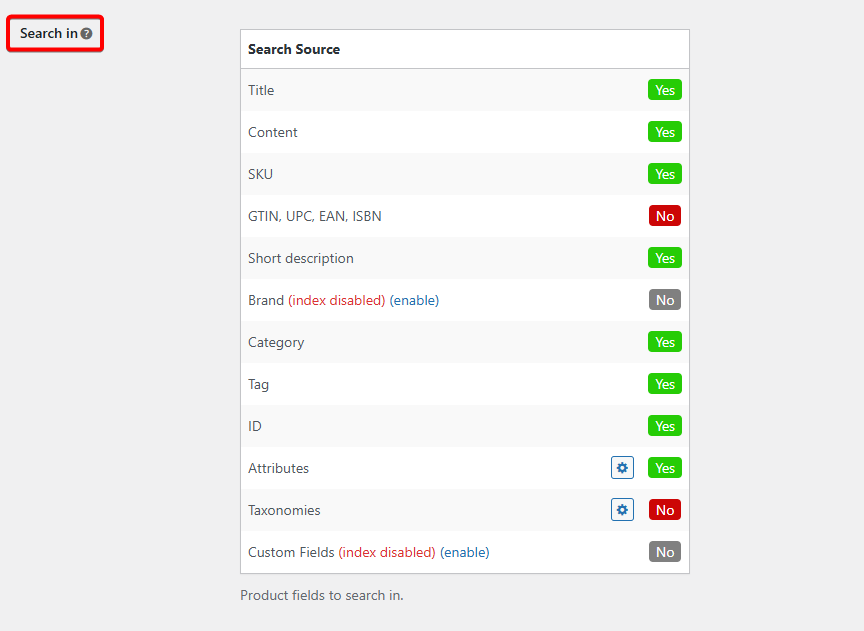
Open Advanced Woo Search → Settings → Search Config. Under the Search In section, you’ll see a list of data types that AWS can include in its search index. Enable or disable each option depending on your store’s needs.
You can include common fields such as title, content, and short description, or extend the search to more advanced data like SKUs, categories, tags, attributes, brands, and custom fields. AWS also supports global product identifiers such as GTIN, EAN, or ISBN.
If your store uses variable products, the plugin can search within product variations as well, allowing customers to find specific versions of a product more easily.
You can further fine-tune search behavior by adjusting:
- Search Logic: Choose between OR (show results if any term matches) or AND (show results only if all terms match)
- Exact Match: Restrict results to full-word matches for more precise queries
- Misspelling Fix: Automatically correct typos and display suggestions like “Did you mean...”
These settings determine what AWS looks for when generating search results, helping your store deliver broader and more accurate matches.
If you’d like to further refine how your results page looks and functions, check out this detailed guide on customizing the WooCommerce search results page.
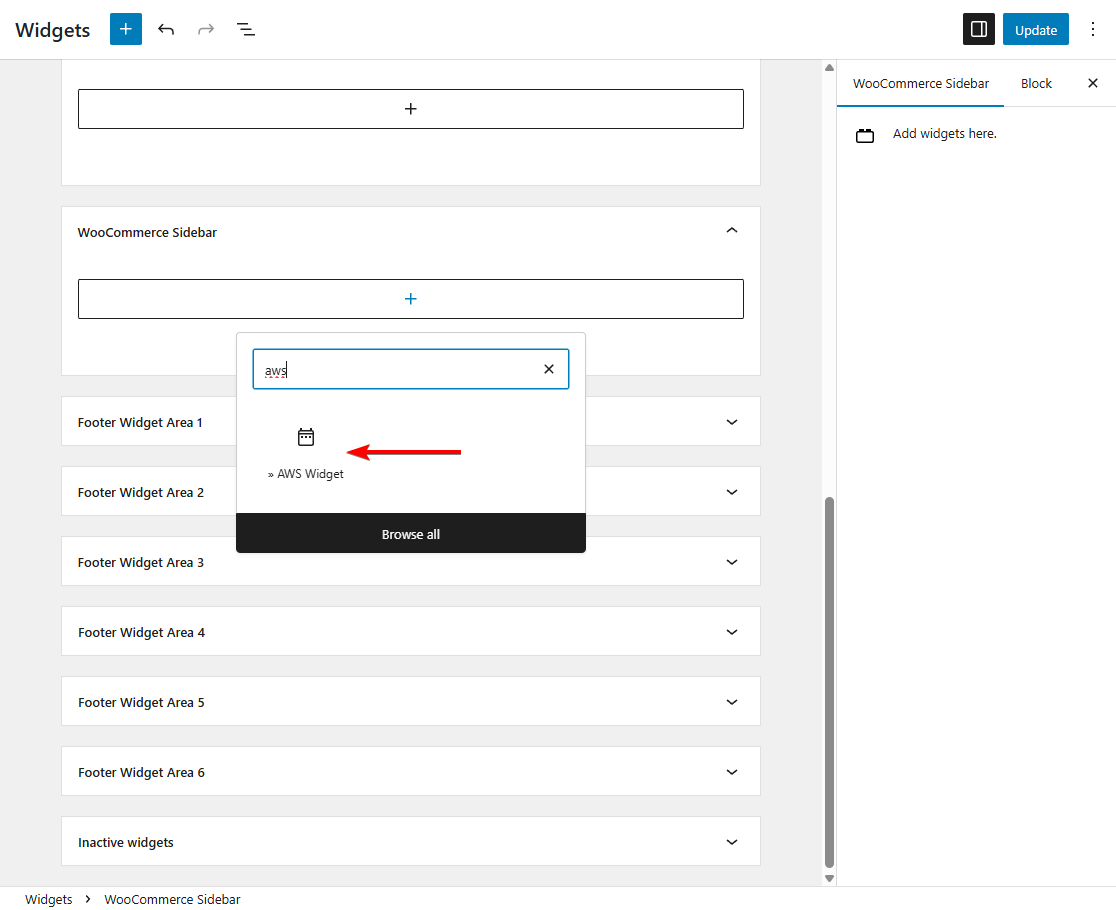
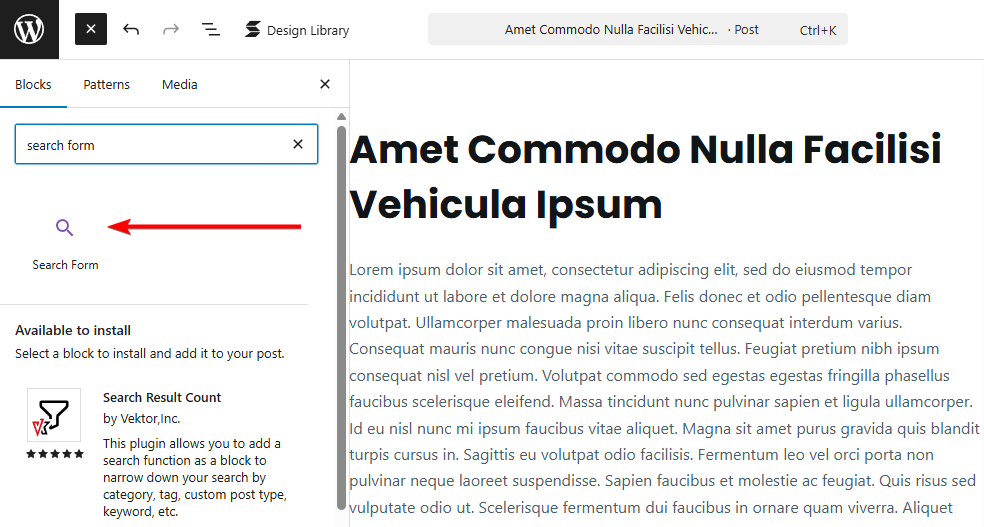
Step 4: Add the AWS Search Form to Your Store
After setting up how your search results will look, the next step is to add the search form to your website so customers can start using it. AWS makes this simple by providing multiple ways to display the search bar anywhere on your site.
You can add the search form using a shortcode, widget, or block, depending on how your theme is set up.
To use the shortcode, copy the code from the plugin’s settings and paste it into any post, page, or custom section where you want the search bar to appear.

If you prefer using widgets, go to Appearance → Widgets and drag the AWS widget into your desired area, such as the sidebar or footer.
If your theme supports the block editor, you can also insert the AWS block directly within a page or template. Each search form instance can have its own independent settings, meaning you can configure one for your header and another for a specific product page if needed.
Common placements include the header, main navigation, or shop page, where customers naturally expect to find a search option. Once added, test the placement to make sure it’s visible, functional, and styled consistently with your store’s design.
When everything looks good, save your changes. Your new WooCommerce search form will now be live and ready to help customers find products more quickly and easily.
For more assistance, take a look at these AWS help docs.
Step 5: Track Search Performance, Test, & Fine-Tune Your Setup
Once your search is fully configured, it’s important to monitor how it performs and make small adjustments over time. Tracking search activity helps you understand what customers are looking for and whether your current setup meets their needs.
If you use Google Analytics, you can integrate it with AWS to record search queries and user behavior. This data can reveal valuable insights, such as which keywords are most popular, which searches return no results, and which products attract the most attention. Understanding these patterns allows you to refine your product catalog, add missing keywords, or improve product descriptions to match customer intent.
It’s also a good idea to test your search form regularly. Try searching by product names, SKUs, categories, and attributes to make sure all expected items appear in the results. If something doesn’t show up, revisit your Search Sources and Matching Settings to verify that the correct data fields are included.
Over time, you can fine-tune elements like delay time, minimum character count, or sorting preferences to optimize both performance and accuracy. Periodic testing ensures that your search remains responsive, reliable, and aligned with how real customers browse your store.
A well-optimized search not only improves the user experience but also increases conversions by helping shoppers quickly find and buy what they want. Regularly reviewing your WooCommerce search settings ensures your store continues delivering accurate and relevant results as your catalog grows.
FAQs
How to improve WooCommerce search?
You can improve WooCommerce search by using a dedicated plugin like Advanced Woo Search. It allows you to include SKUs, categories, and attributes in searches, enable live AJAX results, fix misspellings, and add relevance tuning. These features make search faster, more accurate, and user-friendly.
How to customize the search bar in WooCommerce?
WooCommerce’s default search bar offers limited control, but plugins like Advanced Woo Search let you customize its appearance and behavior. You can add it anywhere using shortcodes or widgets, adjust layout and styling, choose what product details to display, and show instant live results as users type.
Why is WooCommerce product search not working?
If WooCommerce product search isn’t working, check that products are published and visible in your catalog. Clear your site cache, reindex your products, and ensure your theme supports the search widget. For more advanced troubleshooting and better accuracy, consider installing Advanced Woo Search to replace the default search.
Conclusion
WooCommerce’s built-in search works for basic stores but quickly reaches its limits as your product range grows. Its lack of advanced filtering, live results, and relevance control can make it difficult for customers to find what they need.
By using Advanced Woo Search, you can transform this experience. The plugin lets you search across SKUs, categories, attributes, and custom fields, while delivering fast, live results with smarter matching and ranking. It also gives you full control over how results look and perform – all from within your WordPress dashboard.
A well-optimized search helps shoppers find products effortlessly, reduces frustration, and increases conversions. Taking a few minutes to set up and fine-tune Advanced Woo Search can make your WooCommerce store feel faster, more professional, and customer-focused.
- Try the free Advanced Woo Search plugin, or
- Get Advanced Woo Search Pro today!
If you have any questions about WooCommerce search settings, let us know in the comments section below.
Comments