Overview
This tutorial provides steps to add expand/collapse functionality to any WordPress admin dashboard taxonomy terms table. We will use some custom php, js and css code to build this feature.
At the end of this tutorial will be provided a link to download ready WordPress plugin for expand/collapse terms functionality that was built based on current code examples.
As a result, you will get the following layout for any needed hierarchical taxonomy terms table:
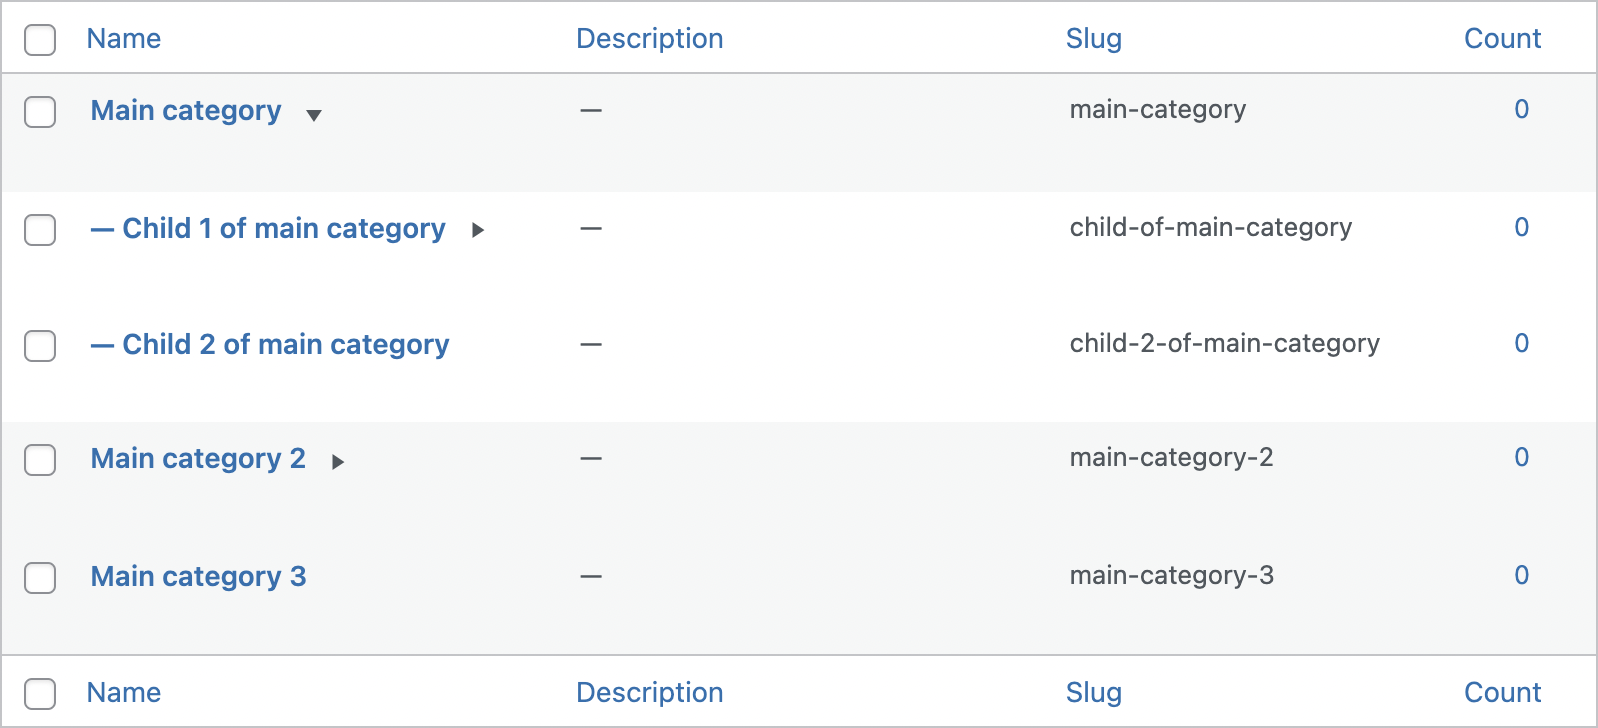
Example of expendable terms table
Why do you need a collapsing terms table?
Have you ever faced the problem with a giant tree of category terms inside WordPress dashboard that is very difficult to navigate and understand what category is a parent for needed one?
In fact, it is a very common problem for WordPress hierarchical taxonomies. Default tree view is great for 2-3 level deep taxonomies, but you will feel pain dealing with over 5 levels deep with that taxonomies tree view.
If a taxonomy has many levels in hierarchy and many terms - the best way to show such a taxonomy inside the admin dashboard is in a folded view. So level 1 terms will be visible and near each of them can be displayed some button to show level 2 terms for each of these parent terms.
We just need to create collapsing child categories for the WordPress admin table.
The problem is that WordPress doesn't support such a collapse view for hierarchical taxonomies. In fact, there are even no plugins at the market that will do such simple things like creating a folded view for taxonomies. That's why we created this tutorial where in step-by-step form explain how to implement this feature.
So a result of this tutorial taxonomy default view like that
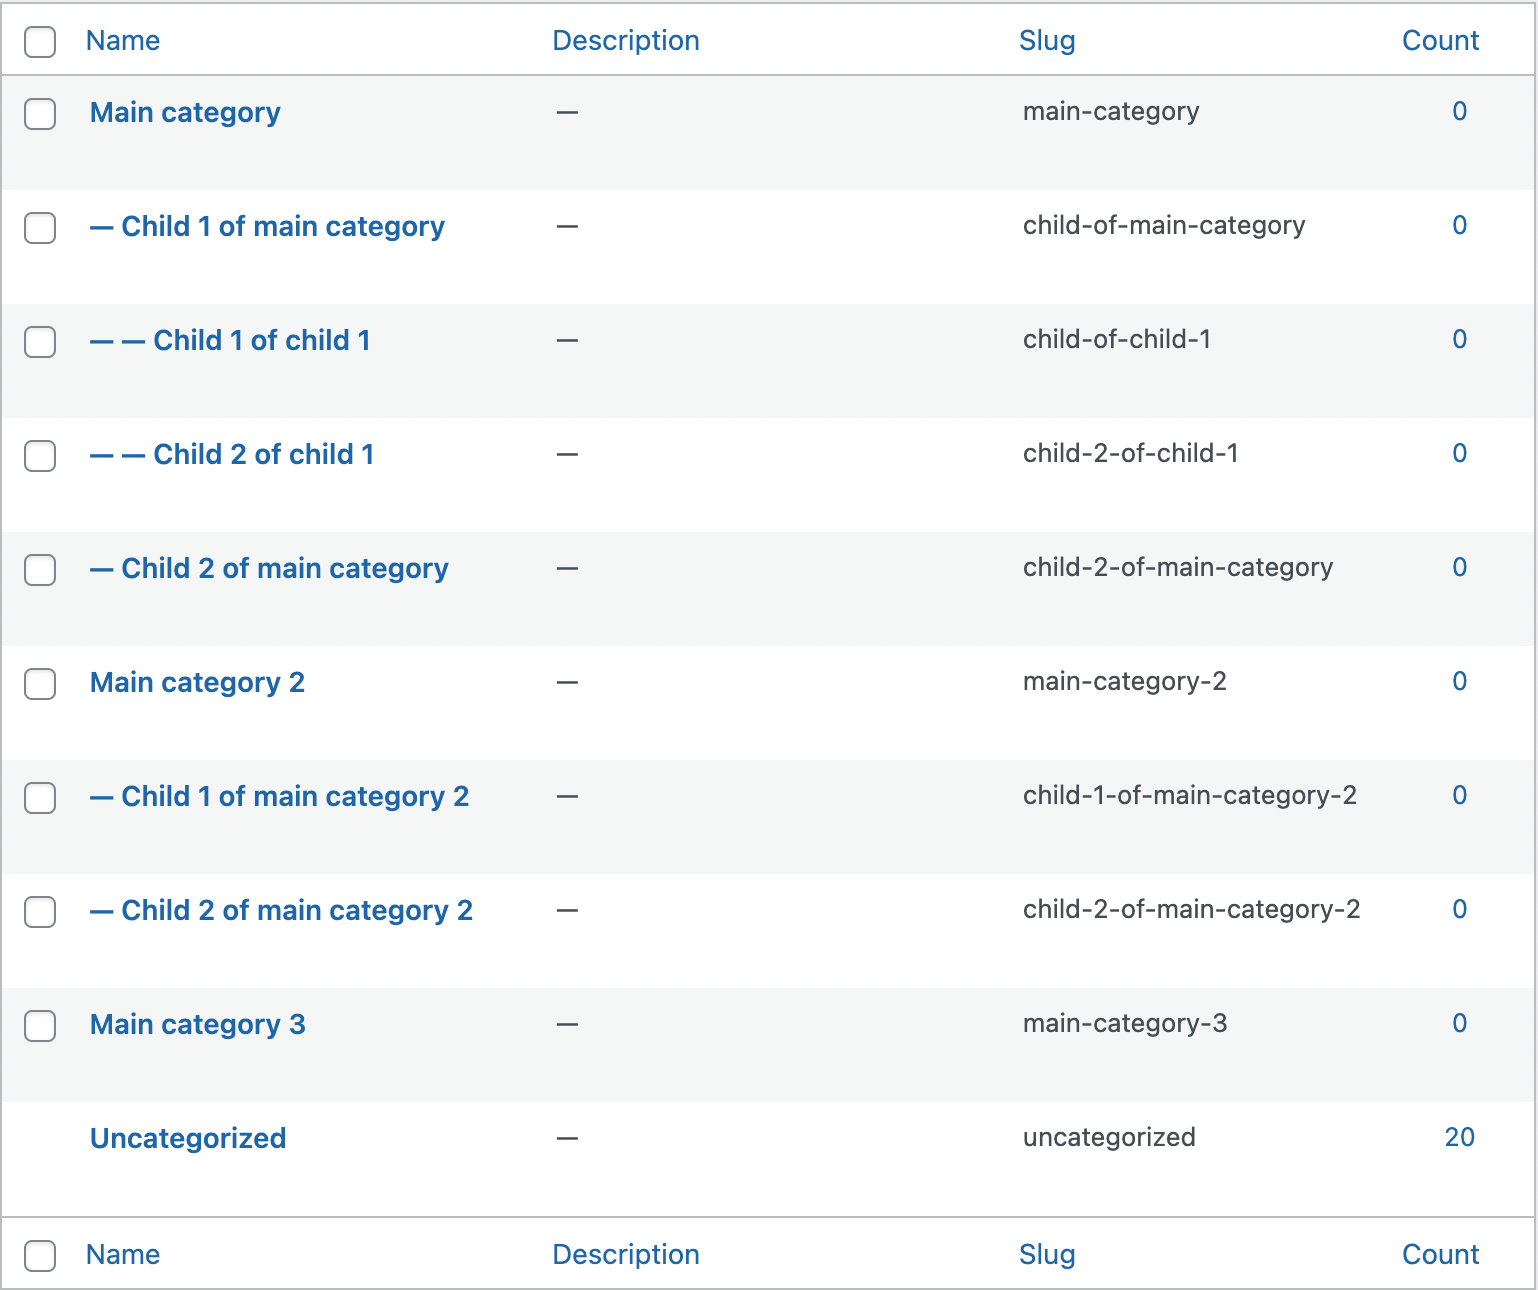
Default taxonomies table view
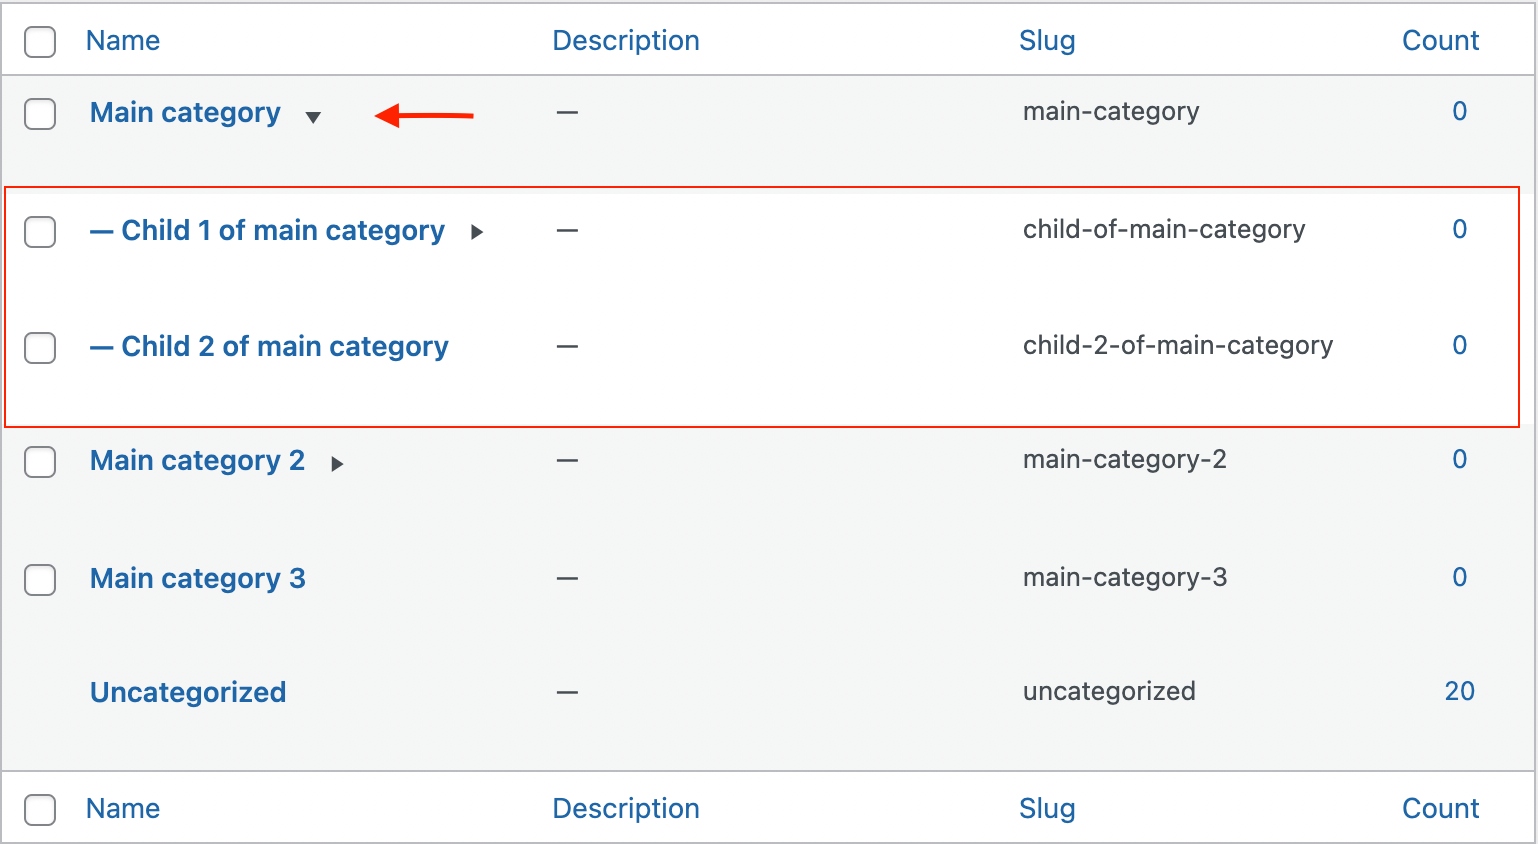
will be transformed to this

Taxonomies folded table view
By clicking on the arrow button near any parent term will be displayed the next level hierarchy terms of this parent one.
Showing child terms
We will also create a special Toggle All button that will show/hide all child terms at just one click.

Toggle all button
Steps to create a collapsing taxonomy terms table
So it is time to get started. When looking inside the taxonomy terms table HTML markup we can find that it looks like that:
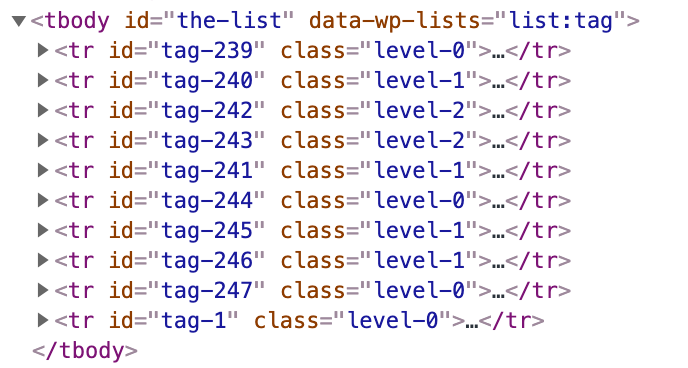
Taxonomy table html markup
It is bad news for us. It was logical to find here the same multilevel list ( with new ul tag for each child term ). But it is only some flat list with only some class names like level-1 that point to what level of hierarchy the current term belongs.
Maybe we can use some WordPress filter to adjust this table markup? Well, disappointment comes again here. There are no filters that can help us to do that. I checked WP_List_Table class and didn't find any filters that can help us in solving this issue.
It looks like the only solution here is to use JavaScript. With some custom script we can walk each term li tag one by one and add arrow buttons where necessary. Then just attach to this button's action that will make visible all term li tags that have class name level-x, where x = parent_term_level + 1.
Also, we will use some custom css style to hide all terms items, add some style to the arrow button, etc.
For better understanding all actions are divided into several steps.
1. Creating a new plugin. The best way to handle all these admin dashboard changes is by creating our new WordPress plugin. In this case it can be disabled/enabled at any time. Also, with such a plugin it becomes very simple to add the same changes to any other website - just by installing the same plugin for any other website.
So let's create a new plugin. It is very simple. Inside wp-content/plugins create a new folder add-collapsing-cats. Inside this new folder also create add-collapsing-cats.php file.
Then open this new file and add the following content inside it:
<?php

/*
Plugin Name: Add Collapsing Tax
Description: Add a feature to make any hierarchical taxonomy collapsable on the admin screen
Version: 1.00
Author: ILLID
Author URI: https://advanced-woo-search.com/
Text Domain: add-collapsing-tax
*/


if ( ! defined( 'ABSPATH' ) ) {
    exit;
}

if ( ! class_exists( 'Add_Collapsing_Tax' ) ) :

    /**
     * Main plugin class
     *
     * @class Add_Collapsing_Tax
     */
    final class Add_Collapsing_Tax {

        /**
         * @var Add_Collapsing_Tax The single instance of the class
         */
        protected static $_instance = null;

        /**
         * @var Add_Collapsing_Tax Array of taxonomies to implement folded view
         */
        protected $taxonomies = array( 'category' );

        /**
         * Main Add_Collapsing_Tax Instance
         *
         * Ensures only one instance of Add_Collapsing_Tax is loaded or can be loaded.
         *
         * @static
         * @return Add_Collapsing_Tax - Main instance
         */
        public static function instance() {
            if ( is_null( self::$_instance ) ) {
                self::$_instance = new self();
            }
            return self::$_instance;
        }

        /**
         * Constructor
         */
        public function __construct() {
            add_action( 'admin_enqueue_scripts', array( $this, 'load_scripts' ) );
        }

        /*
         * Load assets for search form
         */
        public function load_scripts() {

            global $pagenow;

            if ( 'edit-tags.php' === $pagenow && isset( $_GET['taxonomy'] ) && array_search( $_GET['taxonomy'], $this->taxonomies) !== false && ! isset( $_GET['s'] ) && ! isset( $_GET['orderby'] ) ) {

                wp_enqueue_style( 'add-collapsing-tax', plugin_dir_url( __FILE__ ) . '/add-collapsing-tax.css', array(), '1.00' );
                wp_enqueue_script( 'add-collapsing-tax', plugin_dir_url( __FILE__ ) . '/add-collapsing-tax.js', array('jquery'), '1.00', true );

            }

        }

    }

endif;


Add_Collapsing_Tax::instance();
So this simple code just d does one thing - load add-collapsing-tax.css and add-collapsing-tax.js files on WordPress admin pages. We will create these files soon.
Please pay attention to line
protected $taxonomies = array( 'category' );
This array contains all taxonomies that will be used for adding a new folded view. By default it will be used for category taxonomy. Just change this array if you need to use a new layout for some other taxonomy. For example, for WooCommerce categories code can look like that:
protected $taxonomies = array( 'product_cat' );
2. Create a css file. In the same add-collapsing-tax folder lets create file add-collapsing-tax.css and add following styles inside it:
.wp-admin #wpcontent .wp-list-table tbody tr {
    display: none;
}

.wp-admin #wpcontent #posts-filter [data-toggle-all] {
    display: inline-block;
    vertical-align: middle;
}

.wp-admin #wpcontent .wp-list-table tbody tr.level-0,
.wp-admin #wpcontent .wp-list-table tbody tr.level-2,
.wp-admin #wpcontent .wp-list-table tbody tr.level-4 {
    background-color: #f6f7f7;
}

.wp-admin #wpcontent .wp-list-table tbody tr.level-1,
.wp-admin #wpcontent .wp-list-table tbody tr.level-3,
.wp-admin #wpcontent .wp-list-table tbody tr.level-5 {
    background-color: #fff;
}

.wp-admin #wpcontent .wp-list-table tbody tr.level-0 {
    display: table-row;
}

.wp-admin #wpcontent .wp-list-table tbody tr [data-toggler] {
    cursor: pointer;
    width: 20px;
    height: 20px;
    display: inline-block;
    margin: 0 0 0 5px;
    vertical-align: middle;
    text-align: center;
    border-radius: 50%;
}

.wp-admin #wpcontent .wp-list-table tbody tr [data-toggler]:hover {
    background: rgba(0,0,0,.07);
    transition: 0.1s;
}

.wp-admin #wpcontent .wp-list-table tbody tr [data-toggler] .dashicons-arrow-right {
    display: none;
}
.wp-admin #wpcontent .wp-list-table tbody tr [data-toggler].close .dashicons-arrow-right {
    display: inline-block;
}
.wp-admin #wpcontent .wp-list-table tbody tr [data-toggler].close .dashicons-arrow-down {
    display: none;
}
So this style file hides all terms except top level ones. Also, it adds some styling for arrow buttons we will add soon.
3. Create a js file. Inside the plugins folder add-collapsing-tax we need to create the last plugin file - add-collapsing-tax.js. Add following content inside it:
jQuery(document).ready(function ($) {
    'use strict';

    var $table_items = $('.wp-admin #wpcontent .wp-list-table tbody tr');

    if ( $table_items.length > 0 ) {

            $table_items.each(function( index ) {
                $(this).find('.name > strong').after('<span class="close" data-toggler><span class="dashicons dashicons-arrow-right"></span><span class="dashicons dashicons-arrow-down"></span></span>');
            });

            var currentLevel = 0;
            var prevLevel = 0;

            $table_items.each(function( index ) {

                var regex = /level-(d+?)/i;
                var $classes = $(this).attr('class');
                var match = $classes.match(regex);

                prevLevel = currentLevel;

                if ( match && match[1] ) {
                    currentLevel = parseInt( match[1] );

                    if ( currentLevel < prevLevel ) {

                        prevItemsClear( $(this), 'level-' + prevLevel );

                    }

                    if ( currentLevel === prevLevel ) {
                        $(this).prev().find('[data-toggler]').remove();
                    }

                }

            });

            if ( $table_items.last().hasClass('level-0') ) {
                $table_items.last().find('[data-toggler]').remove();
            }

            $('#posts-filter .bulkactions:first').append('<a href="#" data-toggle-all="open">Toggle All</a>');

    }

    function prevItemsClear( $curItem, selector ) {

        var item = $curItem;

        while ( item.prev().hasClass( selector ) ) {
            item = item.prev();
            item.find('[data-toggler]').remove();
        }

    }

    // Toggle all
    $(document).on('click', '[data-toggle-all]', function(e) {
        console.log('toggle');
        e.preventDefault();
        var action = $(this).data('toggle-all');
        if ( action === 'open' ) {
            $(this).data('toggle-all', 'close' );
            $table_items.each(function( index ) {
                $(this).show().find('[data-toggler]').removeClass('close');
            });
        } else {
            $(this).data('toggle-all', 'open' );
            $table_items.each(function( index ) {
                $(this).find('[data-toggler]').addClass('close');
                if ( ! $(this).hasClass('level-0') ) {
                    $(this).hide();
                }
            });
        }
    });

    $(document).on('click', '.wp-admin #wpcontent .wp-list-table tbody tr [data-toggler]', function(e) {

        e.preventDefault();

        $(this).toggleClass('close');
        var close = $(this).closest('tr').find('[data-toggler]').hasClass('close');

        var regex = /level-(d+?)/i;
        var $classes = $(this).closest('tr').attr('class');
        var match = $classes.match(regex);

        if ( match && match[1] ) {

            var currentLevel = match[1];
            var nextLevel = parseInt( currentLevel ) + 1;

            var allSiblings = $(this).closest('tr').nextAll();

            allSiblings.each(function (index) {

                var item = $(this).closest('tr');
                if ( item.hasClass( 'level-'+ currentLevel ) ) {
                    return false;
                }

                if ( close ) {
                    item.hide();
                    item.find('[data-toggler]').addClass('close');
                } else if ( item.hasClass( 'level-'+ nextLevel ) ) {
                    item.toggle();
                }

            });

        }

    });

});
This JavaScript file contains all logic behind the expandable terms view. So first we walk through all terms items and add data-toggler button for each of them. Then we walk through terms items one more time and remove added buttons for terms that don't have child terms. Also, we added Toggle All button near the filters select box.
4. Done. Plugin is ready. All needed files are created and you can just test it for previously selected taxonomies. Just don't forget to activate the created plugin ;).
Download ready plugin for collapsing terms
To make things simpler, I created a ready plugin based on the steps above. So just install and activate it by following these steps:
1. Download plugin for Adding Collapsing Taxonomies Terms.
2. Install it by going to WordPress dashboard -> Plugins -> Add new. Click on Upload Plugin button, choose and upload previously downloaded plugin archive. After installation, activate the plugin.
3. Done. Just check the needed taxonomy page. Remember that by default it is active only for category taxonomy. To enable other taxonomies open add-collapsing-tax/add-collapsing-tax.php file, find line
protected $taxonomies = array( 'category' );
and add inside the array all needed taxonomies slugs.
Comments